
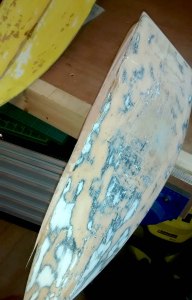
Many older oars have had hard lives. It’s not just the years, but things like rough docks, accidents, and the weather take their toll.
Following on from the paint stripping archeological dig, this set of oars all had worn and damaged end tips and one also had a significant chip off the top edge.
I’ve seen the ‘old school’ boatmen do these repairs very quickly, but here is how I’m bumbling along…
Damaged and worn down.

Old tip removed with chisel.

New tip bonded in place.

Trimmed with saw, then planed to shape.

Two replaced tips beside unrepaired oars.

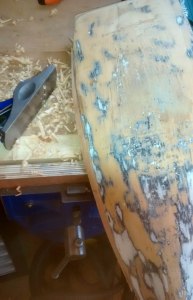
Then I had to repair the damaged top edge…
With small chips it is usually easiest to do a repair with some epoxy filler, but when bigger chunks are gone you need to use pieces of timber. This is how the oars were repaired to rowable condition back in the day.
First I planed the area smooth. Then some new spruce was bonded into place. For economy a thin piece was used, but it had to be put on in two sections so that it could deal with the curve of the blade face. It does stick out a bit!

Then the rough outline for the repaired shape is pencilled on (see above) with the aid of another oar as template, and the excess material was cut off with a jig saw.

Still a bit lumpy, so a small plane was used on the convex back of the blade and a spokeshave used on the concave front of the blade.
Then a bit of coarse sanding to get the shape and edge looking good.


There is still some more work to be done with sanding and light filling, but very soon these two oars will be ready to be painted.
It’s a lot of work, but the final result is worth it.
